Apple iPhone 3GS hard reset
If iPhone 3GS won’t turn on, or if the display freezes or doesn’t respond
* Press and hold the Home button below the screen for at least six seconds, until the application you were using quits.
* If that doesn’t work, turn iPhone 3GS off and turn it on again. Press and hold the Sleep/ Wake button on top of iPhone for a few seconds until a red slider appears, and then drag the slider. Then press and hold the Sleep/Wake button until the Apple logo appears.
* If that doesn’t work, reset iPhone 3G. Press and hold both the Sleep/Wake button and the Home button for at least ten seconds, until the Apple logo appears.
Apple iPhone 3GS hard reset Apple iPhone 3GS soft reset
Updating and Restoring iPhone Software

You can use iTunes to update or restore iPhone 3GS software. You should always update iPhone to use the latest software. You can also restore the software, which returns iPhone to its original state.
If you restore, all data is erased from iPhone 3G, including songs, videos, contacts, photos, calendar information, and any other data. All iPhone settings are restored to their original state.
1. Make sure you have an Internet connection and have installed the latest version of iTunes from www.apple.com/itunes.
2. Connect iPhone 3GS to your computer.
3. In iTunes, select iPhone in the Source pane and click the Summary tab.
4. Click “Check for Update.” iTunes tells you if there’s a newer version of the iPhone software available.
5. Click Update to install the latest version of the software. Or click Restore to restore iPhone 3GS to its original settings and erase all data on iPhone. Follow the onscreen instructions to complete the restore process.
Resetting iPhone Settings
Reset all settings
Choose General > Reset and tap Reset All Settings.
* All your preferences and settings are reset. Information, such as your contacts and calendars, and media, such as your songs and videos, are not deleted.
Erase all content and settings
Choose General > Reset and tap “Erase All Content and Settings.”
* All your information and media are deleted. You must sync iPhone with your computer to restore contacts, songs, videos, and other information and media.
Reset the keyboard dictionary
Choose General > Reset and tap Reset Keyboard Dictionary.
* You add words to the keyboard dictionary by rejecting words iPhone suggests as you type. Tap a word to reject the correction and add the word to the keyboard dictionary. Resetting the keyboard dictionary erases all words you’ve added.
Reset Network Settings
Choose General > Reset and tap Reset Network Settings.
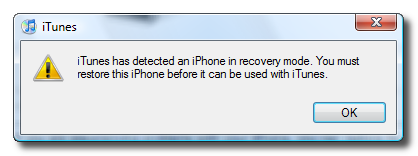
Apple iPhone DFU mode ( Deep Firmware Upgrade)
1. Turn off iPhone.
2. Connect to mac/pc with sync cable / iTunes.
3. Press and hold HOME and POWER buttons for 10sec.
4. Release only POWER button, but continue pressing HOME button for 10 sec.
Now iTunes should detect iPhone in recovery mode.
If iPhone 3GS won’t turn on, or if the display freezes or doesn’t respond
* Press and hold the Home button below the screen for at least six seconds, until the application you were using quits.
* If that doesn’t work, turn iPhone 3GS off and turn it on again. Press and hold the Sleep/ Wake button on top of iPhone for a few seconds until a red slider appears, and then drag the slider. Then press and hold the Sleep/Wake button until the Apple logo appears.
* If that doesn’t work, reset iPhone 3G. Press and hold both the Sleep/Wake button and the Home button for at least ten seconds, until the Apple logo appears.
Apple iPhone 3GS hard reset Apple iPhone 3GS soft reset
Updating and Restoring iPhone Software
You can use iTunes to update or restore iPhone 3GS software. You should always update iPhone to use the latest software. You can also restore the software, which returns iPhone to its original state.
If you restore, all data is erased from iPhone 3G, including songs, videos, contacts, photos, calendar information, and any other data. All iPhone settings are restored to their original state.
1. Make sure you have an Internet connection and have installed the latest version of iTunes from www.apple.com/itunes.
2. Connect iPhone 3GS to your computer.
3. In iTunes, select iPhone in the Source pane and click the Summary tab.
4. Click “Check for Update.” iTunes tells you if there’s a newer version of the iPhone software available.
5. Click Update to install the latest version of the software. Or click Restore to restore iPhone 3GS to its original settings and erase all data on iPhone. Follow the onscreen instructions to complete the restore process.
Resetting iPhone Settings
Reset all settings
Choose General > Reset and tap Reset All Settings.
* All your preferences and settings are reset. Information, such as your contacts and calendars, and media, such as your songs and videos, are not deleted.
Erase all content and settings
Choose General > Reset and tap “Erase All Content and Settings.”
* All your information and media are deleted. You must sync iPhone with your computer to restore contacts, songs, videos, and other information and media.
Reset the keyboard dictionary
Choose General > Reset and tap Reset Keyboard Dictionary.
* You add words to the keyboard dictionary by rejecting words iPhone suggests as you type. Tap a word to reject the correction and add the word to the keyboard dictionary. Resetting the keyboard dictionary erases all words you’ve added.
Reset Network Settings
Choose General > Reset and tap Reset Network Settings.
Apple iPhone DFU mode ( Deep Firmware Upgrade)
1. Turn off iPhone.
2. Connect to mac/pc with sync cable / iTunes.
3. Press and hold HOME and POWER buttons for 10sec.
4. Release only POWER button, but continue pressing HOME button for 10 sec.
Now iTunes should detect iPhone in recovery mode.